
How to Cook Your Potatoes

The most well-used and versatile vegetable in the world has to be the potato. Countries worldwide seem to know how to cook tasty spuds, from Spanish patatas bravas to Indian potato pakora to the French classic, potatoes au gratin.
While any restaurant can cook perfect potatoes, knowing what potatoes to use and how to cook them can set the tone for the entire meal. So I’m here to walk you through some basic cooking techniques and steps to cook delicious potatoes every time!

What you see here is only a small fraction of all of the different potatoes in the world.
A little fun fact, there are over 1,000 varieties of potatoes in the world, about 100 of which are grown in the US. Not to worry, today I’ll focus on types of potatoes found in any grocery store in the US and most regions of the world.
Before you start cooking, it’s essential to know which type of potato is suitable for which dish.
Potatoes divide into two categories: starchy and waxy. Waxy potatoes, like red-skinned potatoes, have a firm texture that holds up after cooking, so they’re ideal for roasting or baking. Starchy potatoes, like russets, tend to break down into a soft, fluffy texture that’s ideal for mashing or baking.

With that out of the way, let’s start with a method you probably didn’t think you needed a recipe for, baked potatoes. I know this can seem like something you can throw into an oven and hope for the best, but knowing how to bake potatoes properly can change your world.
To get started, take your russet potatoes; they’re great because they become light and fluffy once baked, and prick them all over with a fork; doing this will give the steam somewhere to escape and keep your potatoes from exploding in the oven, which can happen. You’ll also want to wash and scrub the potatoes generously, as russets tend to have a good bit of dirt on them.

Rub the skin of your potatoes with oil, season with salt, and place in a 325-degree oven for about an hour and fifteen minutes. To check that the potatoes are done, stick a fork into them, and if the fork can go in easily, they’re done! Once you let the potatoes cool slightly, cut a slit on the top, squeeze the sides to fluff up the flesh, and you’re done!
Fluffy, tender baked potatoes that are as classic as they are simple.
—————————————————————————————————————
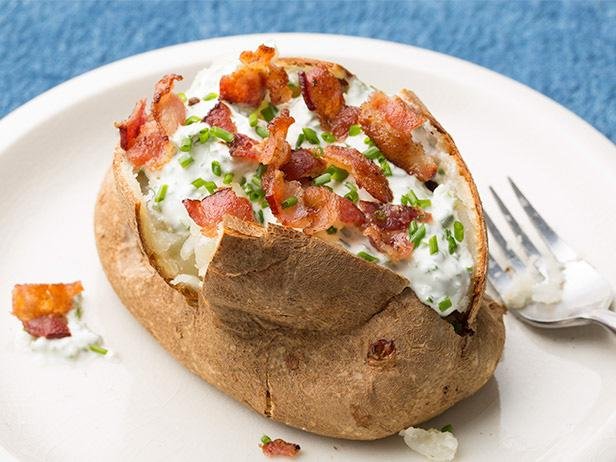
However, If you want to step up your baked potato game, you must bake them twice. Twice-baked potatoes are one of my favorite ways to prepare them, as there is no limit to what can go inside, plus it makes the skin extra-crispy.
Once your perfectly baked potatoes are cool enough to handle them without burning yourself, carefully cut them in half and use a spoon to scoop out the flesh, keeping a thin wall around the inside of the skin.
Once the potato flesh has been scooped out, you can mash them with a potato masher and mix in some butter and milk; think of it as making mashed potatoes. Also, don’t forget to season the potato flesh generously, as potatoes are pretty bland.
Now, it’s time to customize your potatoes with mix-ins; there are many ways this can go. A favorite of mine is mixing in crumbled bacon, cheddar cheese, and green onions, then topping each potato with a generous dollop of sour cream, but you can also add cooked broccoli, other cheeses, herbs like chives or parsley, or anything else you can think of to enhance the flavor of the potatoes.

Once your filling is made, divide into the empty potato skins and put them back into the oven at 350 for about 20 minutes, or until the cheese is melted and the skins are crisp.
I love serving twice-baked potatoes with a steak, a burger, and ribs, but feel free to serve them however you wish.
Next up, roasted potatoes. For this, you’ll want to use a waxy potato like red-skinned potatoes, or something I love is tri-colored baby potatoes; not only do you get a variety of colors, but they look adorable!

Cut the potatoes into evenly sized wedges, lay them on a foil-lined baking sheet, rub with olive oil, salt, and pepper, and roast in a 425-degree oven for about 30 minutes, turning the potatoes halfway in. You can also add hard herbs like rosemary, thyme or sage, or even garlic, but remember that these ingredients tend to burn in the oven, so I’d add them toward the end of roasting.
Roasted potatoes are delicious with grilled chicken, fish, or anything to which you want to add a crispy roasted side.
—————————————————————————————————————
I talked about making French fries in my fish and chips article, which you can check out with the link below, but today I’d like to share the secret for perfect air-fried sweet potato fries that might make you forget about regular fries.
https://the-s-word.net/youre-probably-doing-it-wrong/ypdiw-fish-and-chips

Before moving on, a quick note. Sweet potatoes or yams aren’t as starchy and have a higher sugar content (hence why they’re called sweet potatoes) than russets; they aren’t as fluffy when cooked and tend to burn easier, but they have a lot more nutrients and vitamins that will make it worth the effort.
Cut your sweet potatoes into 1/2-inch thick strips, then let them soak in water for at least an hour; it’s the same thing we do for regular fries; the point is to wash off excess starch and help lead to a crispy texture.
Once the potatoes are soaked, drain them and dry them generously with either paper towels or a salad spinner to get rid of the excess water. You’ll then want to coat the sweet potatoes in oil (any neutral oil will work) and season them.
I like seasoning with paprika, garlic powder, and pepper, but feel free to use any spices or seasoning you like; the only thing I would not add at this point is salt; the salt can pull out the moisture in the sweet potatoes and prevent them from getting crispy, so do salt them at the end.

Since sweet potatoes aren’t as starchy as russets, you’ll need to add starch to help achieve a crispy exterior. Cornstarch is good, but I like using potato starch as it makes that much more sense to me, coating sweet potatoes in potato starch. The starch will mix with the oil to fry up into a crispy outside encasing a tender potato.
Preheat your air fryer according to the manufacturer’s instructions; then air fry the potatoes at 325 for about 10-15 minutes. It’s a relatively low temperature for frying, but it ensures the sweet potatoes get cooked through before getting crispy.
Ok, I’ll admit, these sweet potato fries won’t have the same crunch and texture as classic French fries, but doing it with this method will guarantee to make you want to eat them even more!

—————————————————————————————————————
Storytime: Once upon a time, at a restaurant in New York in 1853, an unnamed man walks in for dinner and orders some fried potato wedges but wants them extra crispy. The restaurant's chef, George Crum, complies with this order and sends the potatoes as crispy as he can make them.
The potatoes were less crispy than the man wanted, so they were sent back. Thinking it was a simple mistake, Chef Crum makes a new batch of potatoes but makes them even crispier, so he thought, and sends them out, only to get sent back once more.
This goes back and forth like this a few more times, Chef Crum trying as many ways as he can think of to make the potatoes as crispy as possible; he tries cutting the potatoes smaller, turning up the oil temperature, frying them longer than usual, but none of the potatoes sent were crispy enough.
Finally, fed up with this man’s order, Chef Crum takes some potatoes, slices them as thin as possible, fries them up, and serves them. It turns out that this is exactly what the man wanted, thus giving birth to one of America’s favorite snacks.
Potato chips may have been drawn up out of spite, but that didn’t stop them from spreading like wildfire across America, and while you can get them for about a dollar, those chips are nothing compared to the ones you can make at home.

These crispy, golden discs don’t even compare to cheap bags of chips that just taste like salt.
To get started, slice your potatoes as thin as possible; a mandolin would be very useful here. Once sliced, submerge the potatoes in cold water to rinse off the starch and prevent them from turning brown.
Heat about 3 inches of vegetable oil in a shallow pot to 300 degrees, drain the potatoes thoroughly, then slowly slide the potato slices into the oil, putting in one at a time. You may need to do this in a few batches to keep the oil temperature from dropping too much.
Use a spider strainer or other slotted utensil to stir the potatoes around to keep them from sticking to each other, and fry for about 5 minutes until all of the potatoes are golden.
Drain onto a paper towel-lined sheet pan and immediately season with salt.
There you go, beautiful homemade potato chips. You can serve them with your favorite dip, toss them with any seasoning or spice, or eat them as they are for a crunchy snack.
—————————————————————————————————————

Now, it is time for the all-mighty mashed potatoes. If there is ever a better friend for gravy, I have yet to meet them.
To get started, peel your potatoes and cut them into even-sized chunks. Russets are classic, but I like using Yukon gold potatoes as they are starchy like russets but have a creamy, buttery flavor that is incredible in a mash. Also, I usually like to keep the skin on my potatoes for mash, but peeling them is a must for creamy restaurant-style potatoes.
You’ll want to put your cut potatoes into a pot, fill them with cold water to cover the potatoes, place them on the stove, and bring them to a boil. It will ensure that they cook evenly by heating the water with the potatoes inside. Make sure to salt your water until your potatoes are boiling. If you’ve been following my content, then you’ll know why.

Boil the potatoes for about 20 minutes, or until they fall apart easily; this is a step that people skimp out on and end up with chunks in their mash; you want the potatoes to fall apart quickly as they’ll mash easily.
Drain your potatoes, and now is the part that separates fluffy, creamy mashed potatoes from a gummy, gluey mess, which happens when potatoes are overworked. A ricer is one of the best tools for the job; the ricer pushes the potatoes through tiny holes to make small threads of potatoes that will take in the dairy easier.

Speaking of dairy, you do not want to add cold dairy to your potatoes as it won’t mix in evenly. Slowly heat your dairy as you mash your potatoes until they come up to a simmer; for a pound of potatoes, I’ll use about a stick of butter and 1 cup of heavy cream. It sounds like a lot, but you do need it to create creamy, velvety potatoes. Besides, I said these mashed potatoes would be good, I didn’t say they would be low-fat.
If you want to infuse your dairy with aromatics like garlic, rosemary, or bay, I recommend it; but make sure you strain your dairy as you add it to the potatoes. Also, do not add all of your dairy at once, as it will make it soupy; slowly add the cream mixture until you’ve reached the desired consistency. Then, taste it, season it with salt, and serve!
You’ll have a plate of perfectly cooked, fluffy mashed potatoes for your holiday guests or whatever you’re making them for.

Bonus recipe: I could not end this potato journey without talking about the king of potato dishes, gnocchi (pronounced: no key), that little potato pasta everyone loves, and is a fantastic way to use leftover baked potatoes.

As with the twice-baked, you want to start by cutting the potatoes in half, scooping out the flesh, and passing them through a ricer. The potatoes will go through the ricer easier when they are hot, but they’ll still work if cold. If you don’t have a ricer, you can also mash the potatoes with a fork for a light texture.
Once your potatoes are crushed, make a well in the center, and add a beaten egg, salt and pepper, and flour. With gnocchi, the less flour you add, the better, as adding too much flour at once can make the gnocchi dense, so add a little bit at a time. You want enough flour to allow the potatoes to form together into a tacky dough.
Turn your dough onto a floured surface and gently knead it into a ball. There are lots of ways to cut gnocchi, but I like to divide the dough into pieces, roll them out into a 1-inch thick log, and cut them into 1/2-inch pieces. The pieces don’t have to be perfect, but they do need to be even.

To cook the gnocchi, lay the dough pieces into a pot of salted simmering water and leave them for about 2 minutes. You’ll know that the gnocchi is cooked when it floats to the water’s surface.
There are about as many ways to serve gnocchi as grandmothers in Italy, but a classic is tossing them in brown butter, then finishing with sage and a grating of parmesan.
Before you know it, you’ll find yourself with a plate full of rustic Italian gnocchi that will guarantee to impress your family or friends.

Potatoes are the undisputed king of vegetables, and with so many ways to cook them, it’s like an edible Swiss-Army knife.