Italian Nachos
(This article contains images and content that are incredibly non-Italian. If you are of Italian heritage or grew up in Italy, then I strongly suggest you proceed through this article with caution.
You have been warned.)
Nachos are a classic that is eaten in Mexican restaurants and bars all across America, there’s just something about that pile of cheesy chips that makes them incredibly addictive, so today I thought I’d put an Italian spin on classic nachos and see if I can come up with something good.
I don’t want to sound overconfident, but I do think that my culinary knowledge and understanding of flavor combinations will lead me to make something great.
So, my thought is to take the classic components of nachos and give them a twist to make them seem like something an Italian-American bar would serve. Here’s the breakdown of that.
Chips
The foundation for nachos is crunchy chips that are meant to pick up all of the cheese and toppings to deliver those goodies to your mouth.
While tortilla chips are certainly the nacho standard, I wanted to step it up a bit, so I will be making wedges of lavash. Lavash is a Middle Eastern cracker that is very easy to make and requires very few ingredients, I will be adding some Italian seasonings to it to help the cracker tie in with the theme of my nachos.
Sure, Italy isn’t a Middle Eastern country but…I’ve seen lavash at an Italian restaurant, so I believe it’ll be valid.

Cheese
Your basic nachos are placing cheese on top of chips and melting them, creating those gooey, cheesy bites of happiness.
When thinking of cheeses to use for Italian nachos, I needed to think about flavor, melting quality and overall texture.
For it’s melting purposes, I’ll be using low-moisture mozzarella, the kind that comes in blocks and is often grated on top of pizza, for flavor and additional melt, I’ll be using one of my favorite hard cheeses, gruyere, and for some funk, I’ll be using some wonderful gorgonzola.
Also, rather than scattering the cheese on top of the chips, I will be creating a cheese sauce that I’ll pour onto my lavash as I feel like I’ll get a more even distribution of the different cheeses.
(By the way, if you even think of using that bagged, pre-grated stuff, I will find out where you live, come to you, and personally smack you.)

Fillings

Classic fillings for nachos often include meat, beans, and sometimes some veggies, although I have no problem with fully vegetarian nachos.
To that extent, I’ll be filling my nachos with some ground beef that I’ll sautee with some onions, bell peppers, mushrooms, garlic, and chili flakes because, let’s face it, with something like nachos you do need to get some vegetation and spice there.
Also, rather than the classic nacho black beans, I’ll use some cannellini or white kidney beans, as those are very Italian.
Garnishes
Classic garnishes for nachos include but are not limited to, salsa, guacamole, sour cream, and cilantro.
Instead of salsa, I’ll simply toss some chopped tomatoes with some olive oil and a splash of vinegar for a fresh, acidic bite to counteract all of that cheese and sprinkle some chopped basil on top because why not.
As for sour cream…well…look, sometimes a classic simply cannot be beaten. I’ll still put a dollop of sour cream on top of my Italian nachos because I love sour cream that much.
Also, I’m not going to mess around with guacamole by trying to find some Italian variation, I’m just going to leave that part out. These nachos will still be very flavorful.

Alright, I think we have all of the basics covered and I’m getting hungry, so let’s get into it!
Italian Nachos
Serves 1-2
For the Lavash chips*:
1 cup of flour, plus more for dusting
1/4 teaspoon of salt, plus more for sprinkling
3 tablespoons of olive oil, divided
1/4 cup of water
2 teaspoons of Italian herb blend
1/2 teaspoon of garlic powder
For the cheese sauce:
2 tablespoons of butter
2 tablespoons of flour
1/2 cup of milk
2 ounces of gruyere cheese, grated
2 ounces of low-moisture mozzarella cheese, grated
2 ounces of gorgonzola
Salt
For the filling:
Olive oil
1/2 pound of ground beef
Salt and pepper
1 small onion, finely chopped
1 small red bell pepper, finely chopped
4 ounces of mushrooms, stems removed, halved, and thinly sliced
2 cloves of garlic, minced
1 teaspoon of red pepper flakes, optional
1/2 can (7 ounces) of cannellini beans, drained and rinsed
For the toppings:
2 tomatoes, seeded and diced
1/2 tablespoon of olive oil
1 teaspoon of red wine vinegar
Salt and pepper
2 tablespoons of sour cream
Thinly sliced fresh basil, for garnish
*Note: If you don’t want to go through the trouble of making your own chips, then just use some regular tortilla chips.
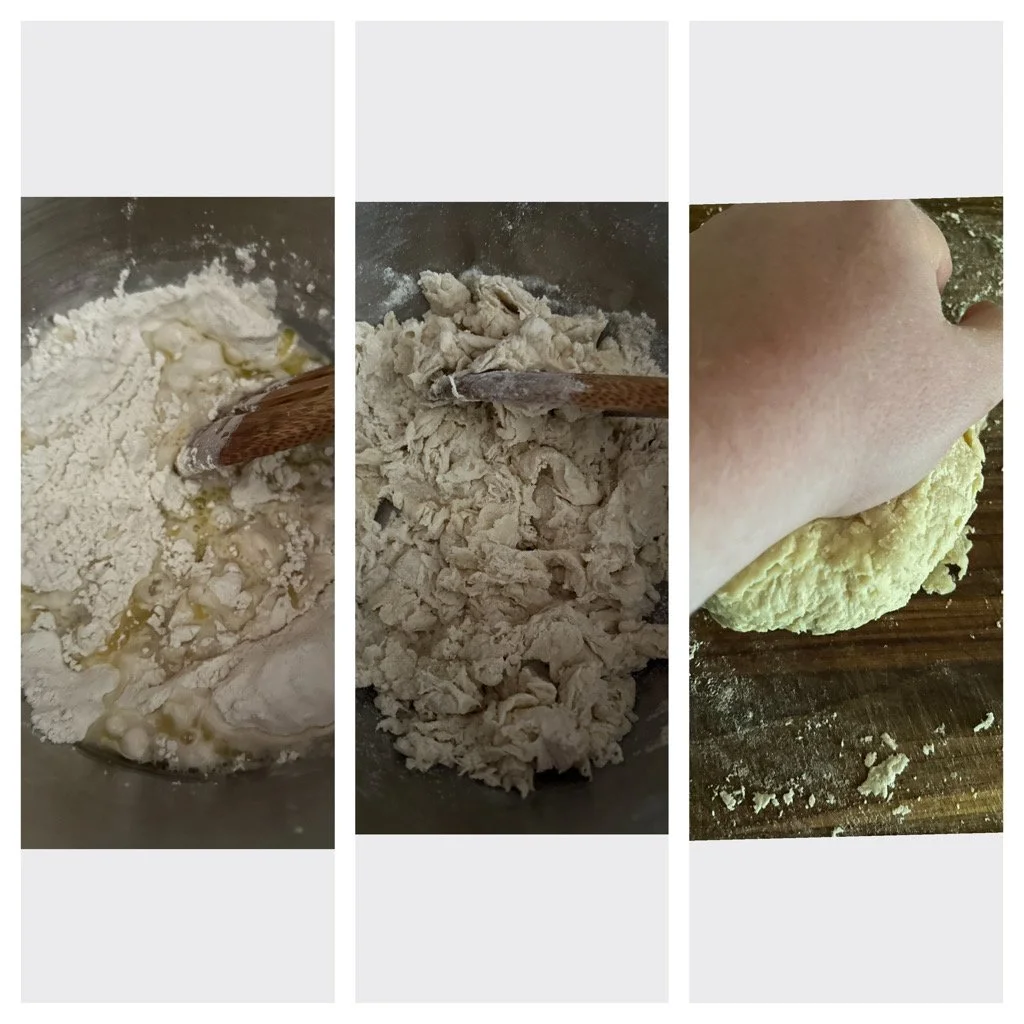
Step 1: Make the Dough for the Lavash
Preheat the oven to 375 degrees and line two baking sheets with parchment paper.
In a medium bowl, mix together the flour and salt. Add the water and 2 tablespoons of olive oil, then mix with a wooden spoon until a shaggy dough forms.
Dump the dough onto a floured surface and knead the dough for about a minute, or until the dough becomes smooth and elastic.
Step 2: Roll and Bake the Lavash
Cut the dough into 3 portions, then, working with one piece at a time, roll each dough piece as thin as you can (1/8 inch thickness.)
(Tip: if you have a pasta machine, then that will be perfect for making sure the dough gets rolled to an even thickness. And you thought pasta machines were just good for pasta, didn’t you?)
Cut the dough sheets into triangles, then lay them onto the sheet pans in a single layer, making sure they do not overlap.
Mix together the Italian herb blend and garlic powder in a small bowl. Brush the remaining tablespoon of olive oil into the dough triangles, and sprinkle them evenly with the herb-garlic mixture, and a bit of salt.
Bake for 6-10 minutes or until golden brown and crisp. Leave to cool on a wire rack and turn on the broiler.

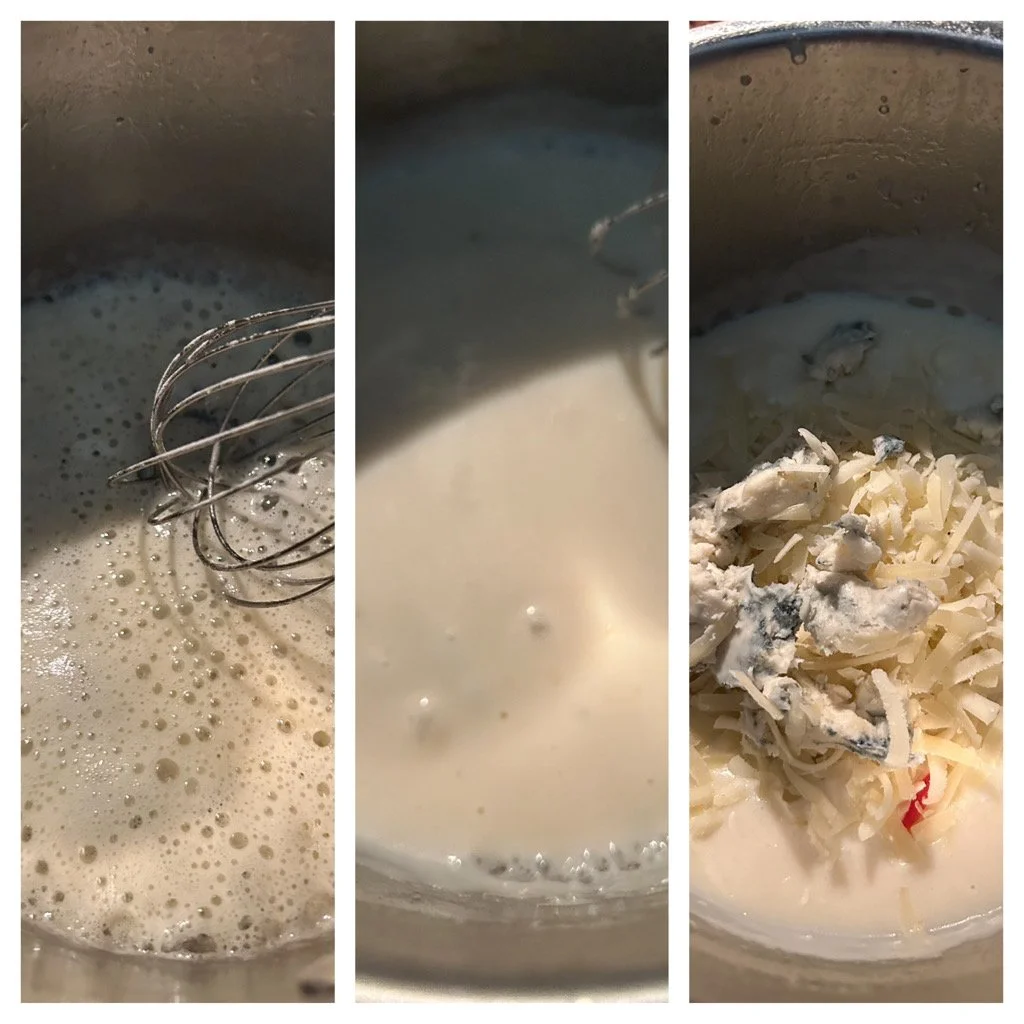
Step 3: Make the Cheese Sauce
Melt the butter in a saucepan, then add the flour and cook for a minute to form a roux.
Slowly add the milk, whisking frequently, and cook until slightly thickened.
Add 3/4 of each cheese, saving the rest for sprinkling on top, and whisk until melted and smooth. Season with salt, then set aside.
Step 4: Cook the meat and veggies
Heat a thin layer of olive oil in a large frying pan, then add the ground beef, season with salt and pepper, and cook for about 6-8 minutes, or until the beef is browned and there’s no visible pink reamining.
Add the onions, bell peppers, and mushrooms, then cook over high heat, stirring occasionally, for about 5 minutes until the vegetables are softened and slightly browned. Add the garlic and chili flakes (if using), then cook until the mixture becomes fragrant.

Step 5: Prepare the Garnish
Toss the diced tomatoes with the olive oil, vinegar, and season with salt and pepper. Set aside.
(Before we move on, I want to clarify something. It’s easy to think that nachos are just a messy pile of chips, cheese, and fillings, but it does not have to be this way.
The method I’m about to show you involves layering the ingredients in a way that makes them look as appealing as they taste.)
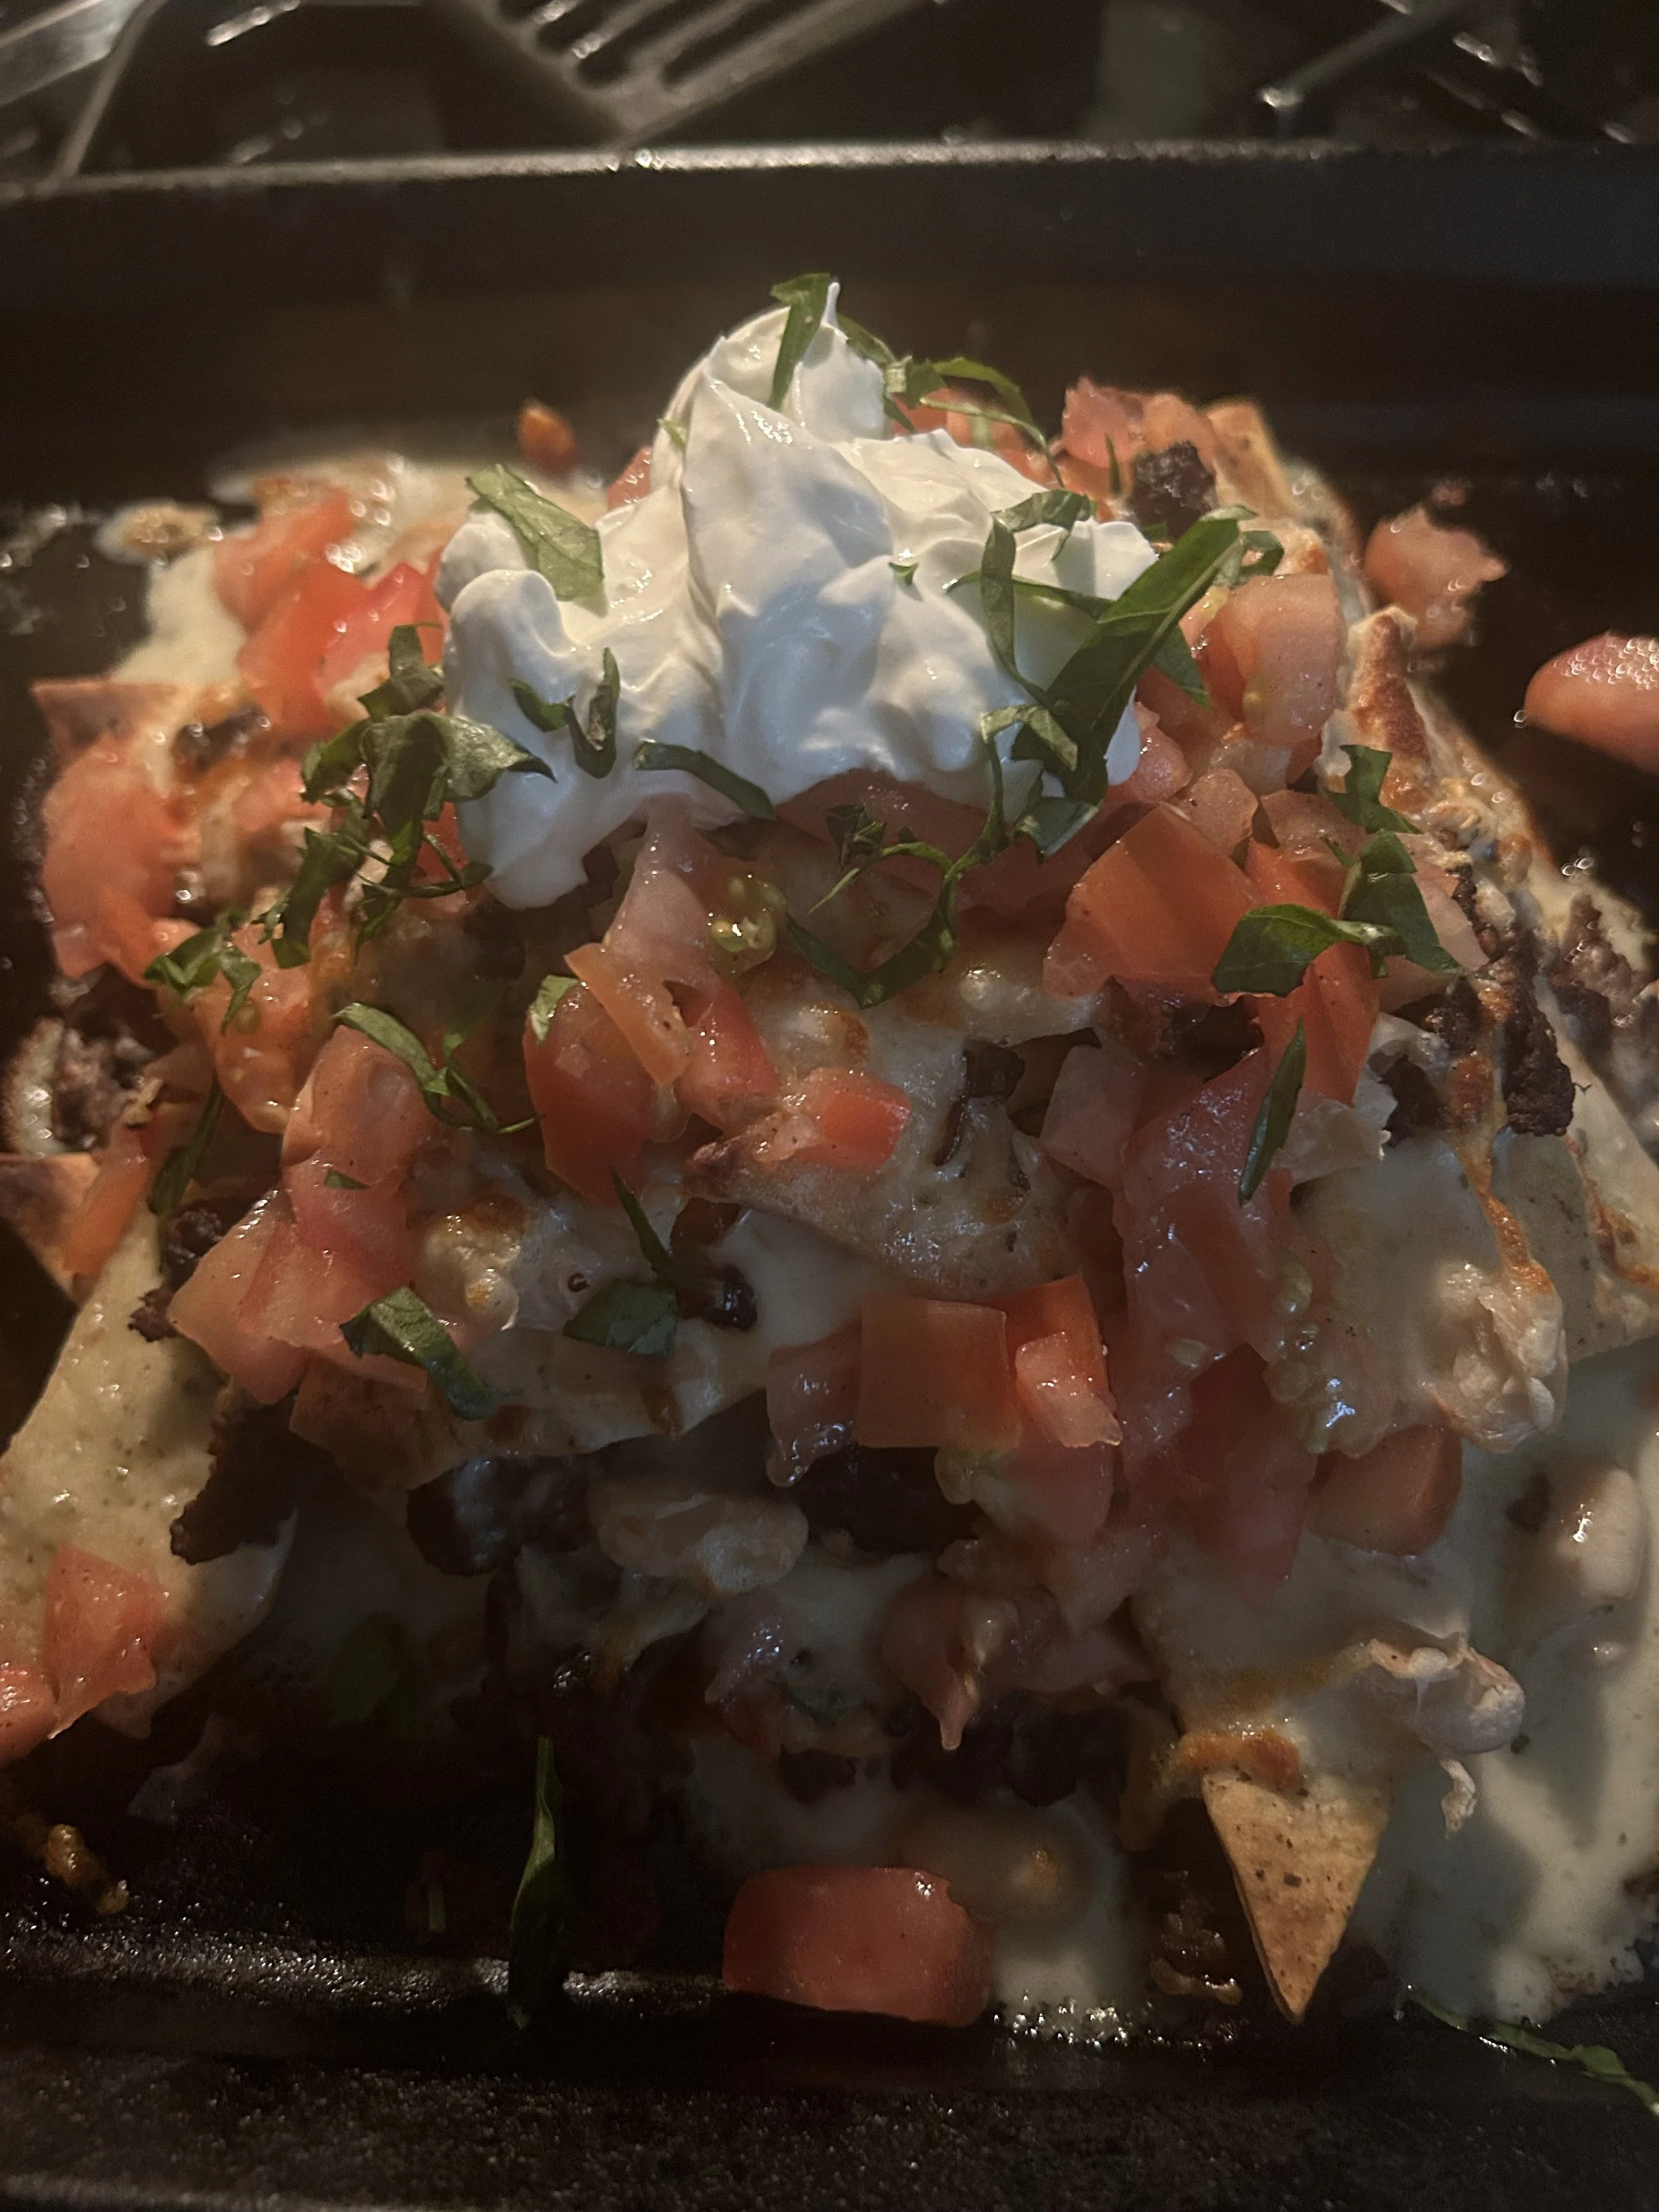
Step 6: Assemble the Nachos
Lay half of the lavash chips onto a greased, inverted sheet pan, then top with half of the cheese sauce, half of the meat mixture, and half of the beans. Repeat this step with the remaining components, then top with the cheese you set aside.
Put the whole tray under the broiler until the cheese is bubbly and golden.
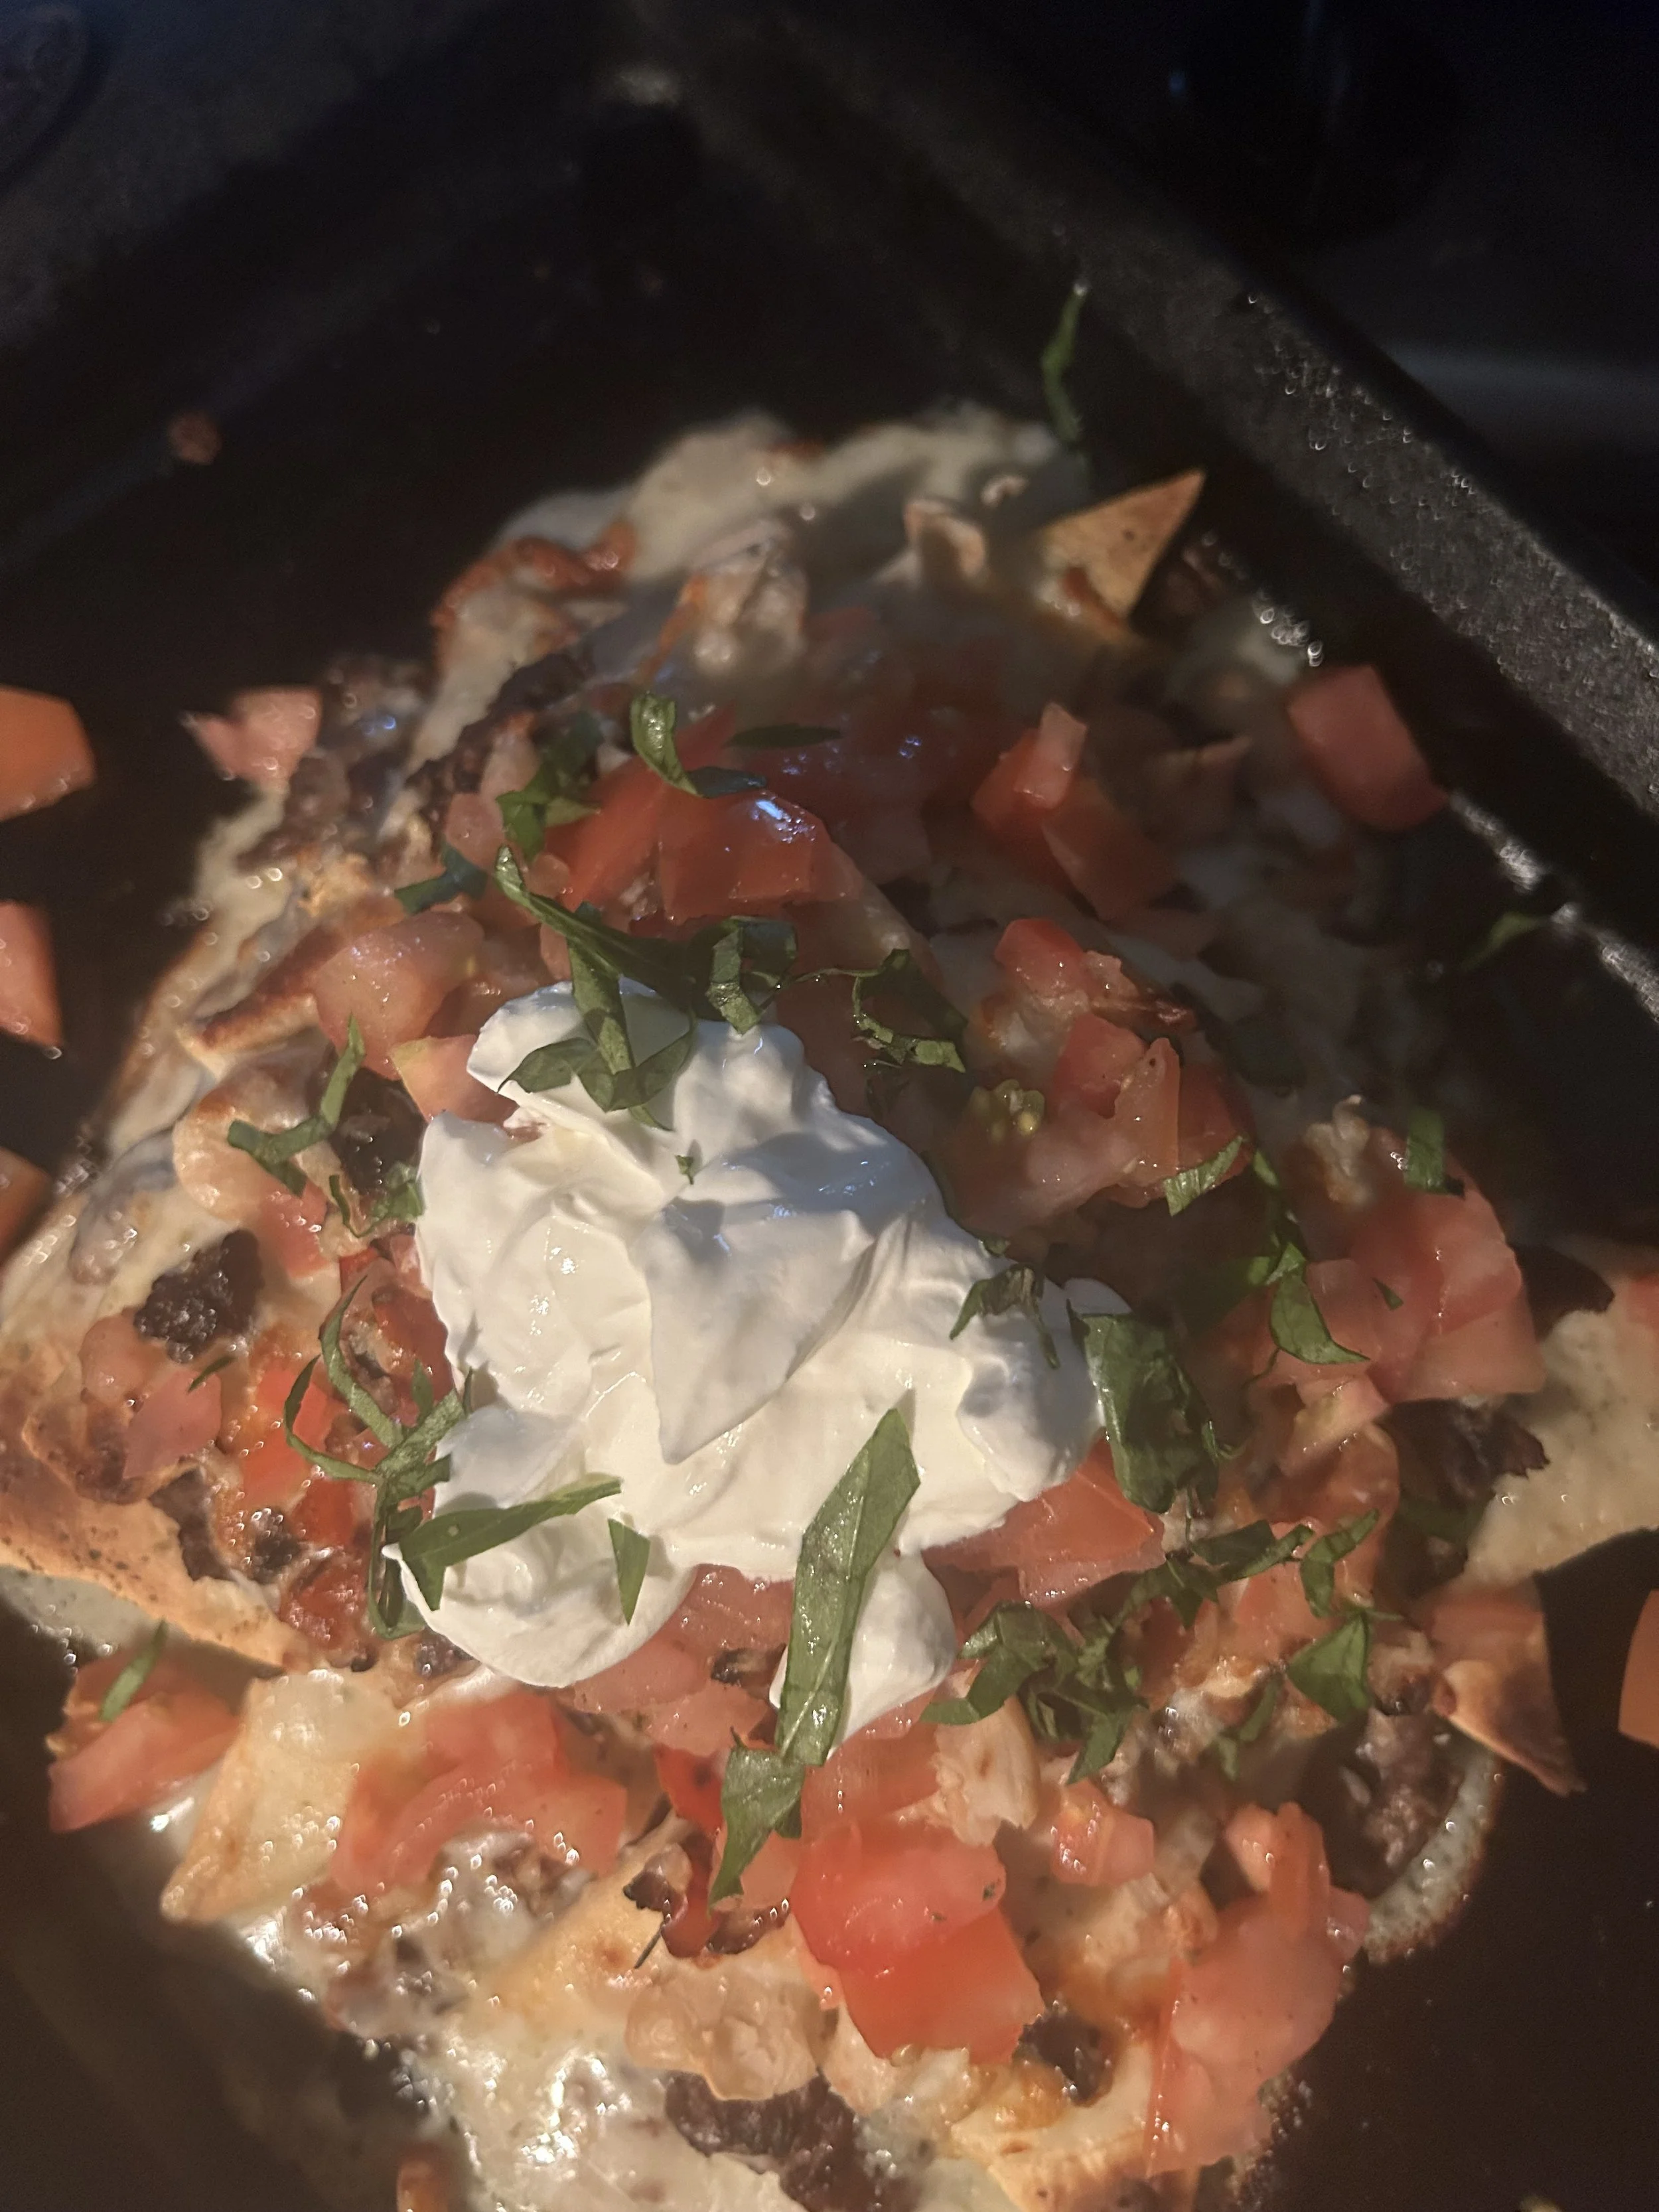
Carefully slide the nachos onto a plate or serving platter, then top with the tomato mixture, sour cream, and a sprinkle of basil.

Ok, there’s no way you’ll see nachos like these in any Italian restaurant anytime soon, but one taste and you will certainly appreciate the effort.
Crunchy lavash chips, the cheese sauce that’s full of flavor, the beef, the veggies, the beans, and all of the other wonderful components come together in a harmonious way.